_11zon.webp?width=800&height=400&name=WPML_logo%20(1)_11zon.webp)
The WPML plugin allows you to have your WordPress website translated with ease. Once the plugin is installed, your translation provider can link to your website and you can push content over for translation and automatically pull the completed translations back to your site. The plugin also provides the ability to manually download and send XLIFF files (XML Localization Interchange File Format) for translation if you prefer to not have a direct and seamless connection.
There are a few things to keep in mind when setting up your content for translation:
Is your English site complete?
This is probably the most important question to ask before initiating your website translation. You will really want to hold off on making any English content changes while your website is in translation. If your English is in the process of being revised, you will want to finish updating it and then essentially freeze it from further charges until after the translation is complete. This is called the “pencils down” phase.
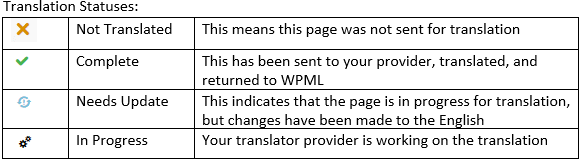
If English pages are edited after they are sent for translation, they will need to be re-sent through the WPML Plugin after the original content is completed. Any change, including formatting or image changes, will change the status to “needs update”, see below. Also, if your content was already pushed for translation when it comes back it will not match your English which may create confusion and extra costs in troubleshooting, revising, and retranslating. Therefore, the best practice is to completely hold off on any kind of changes to your website until after the translation is complete and pushed back.
Consult with your translation provider regarding how the language codes need to be mapped
For example, WPML typically does not include sub-languages. In order to map properly with a translation system, the codes need to match exactly. We recommend scheduling time with your provider to do a screen share for the initial connection so that everyone is on the same page. An example language code would be “en-US” for US English but some webmasters may choose to just use the two-letter code “en” for English.
You will also need to decide how you want your translated URL to appear. Either as a separate domain per language or the language added as a parameter.
.webp?width=582&height=161&name=image-2-1%20(2).webp)
Consider hiding the translated website pages until the translation is complete
If you do not hide the pages they will be viewable to the public as pages are translated and pushed back. Hiding them will ensure that they won’t be accessible to the public until you decide to publish them.
.webp?width=582&height=167&name=image-3%20(1).webp)
Consider allowing your translation provider to be set up as a “Translation Manager”
This gives your vendor access to the WPML Plugin features and they will be able to help with troubleshooting. They can confirm what was pushed and that the translations were successfully pushed back. We suggest granting your translation provider access to your site so that they can troubleshoot more efficiently.

Know the four locations that pull content for translation

Translation Management contains all the main pages and posts. You can select which ones you’d like to translate in which language(s).
Media translation contains the media pieces from your website which you can select for translation if necessary.
String translation is where the menus of your site live and are translated. They are not included in the page structure in WPML and need to be sent separately through the strings menu. String translations are essential for all the buttons and UI on your site. This section is often overlooked. When you get your translation back if you notice text on your website is not translated, more often than not, it is in the strings section.
Taxonomy translation is where you are able to translate by category or group instead of choosing individual pages.
Consider doing some round-trip testing
Consult your translation provider about setting up a scenario where you send over pages for translation and they send back a “pseudo translation” in all uppercase letters. You can then easily review the “translated” pages to see if any content was missed. This review allows you to troubleshoot the areas that were missed so you can add them to your translation basket.
About Us ——–> ABOUT US
We recommend the ALL CAPS pseudo-translation as it will be very easy to locate what is missed. We do not recommend that you use Google Translate or machine translation to pseudo-translate in testing. Sometimes words are the same in the translated language which could cause confusion on whether or not something was missed. Also, the machine translation content may be accidentally left on the site causing a potentially embarrassing situation.
We’ve found that setting up one connection for a production/live site, and one connection for a testing/staging site is ideal. The production site would be used for any live content, and the testing site could run the all-caps scenario as mentioned above. When testing, you can identify what fields may not be sent for translation, and work with your developer to ensure all required fields are included in the project. After all the testing is complete, please alert your provider so they can flush/clear that project on their end.
Decide how you would like to handle the review process
If you have in-country reviewers who will review the translated content, make sure to discuss this with your translation provider so they can set up the proper workflow. The most cost-effective approach is to have your reviewers review the content in a bilingual export from the translation provider’s system. This will allow for any changes made during the review to be incorporated seamlessly into the final content and your Translation Memory will stay consistent, correct, and up to date.
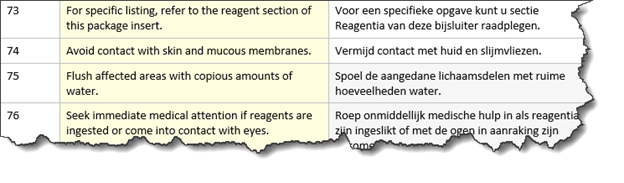
If you’d prefer to have your team review the content in the finished translated website that is also possible. The reviewers would need to take good notes and take screenshots to show your translation provider what they want to change. Your translation provider would then need to make those changes in their Translation Management System and push the translations back through the plugin. A typical bilingual file sent for client review looks like this:
You want to avoid making manual changes on the translation pages in the plugin. All changes should flow through the plugin to allow the website to stay up to date and for you to retain the material in your Translation Memory. Manual onsite translations can’t be added to the TM later, which will put you at a great disadvantage regarding time, cost, and quality when you make updates to the English in the future.
Consult WPML help articles
WPML has a very robust help site. We’ve found the best way to search for WPML help is by doing a Google search or searching in the documentation and help section on the WPML site (https://wpml.org/documentation/). This will bring you to the most up-to-date articles. An example would be “Adding new languages to a translated WPML site.”
Ready to get started but don’t have the WPML plugin yet? Download the plugin and check out the Getting Started Guide.


