With millions of users, Adobe InDesign is one of the most popular tools for creating brochures, flyers, user manuals, and everything in between.
While there are several different ways to build your InDesign document, there are certain things you should keep in mind to maximize efficiency when it comes to translation, and this will minimize both the time and, of course, the cost involved.
–
Tip 1: Finalize your InDesign file
The first thing to consider before heading to translation is the status of your file. Is it final? There are workflows that will take into consideration files that are frequently updated, but generally speaking, InDesign files (INDD) should be in publish-ready form, and the final content should be approved before being sent to translation.
Pay for your translation once by making sure your copy is final, with no expected content or formatting changes, before sending it to translation. The translations you receive back will follow the original content and formatting. Altering either of these after the translation is in progress will increase costs, and if it is in many languages, that extra cost will be multiplied. Any changes you make to the original file must be reproduced in every language.
A quality translation workflow for an InDesign project involves these steps:
- File Preparation
- Translation
- Independent Editing
- QA in TMS (Translation Management System)
- Formatting
- Final Linguist Review
- Final QA by Project Manager
Depending on where the current project is in the translation workflow, you can expect to pay additional fees for redoing work that is already completed. For example, if the changes come late in the workflow, your project manager will have to get those changes translated, edited, added to the Translation Management System TMS (to maintain proper translation memory), formatted, reviewed, etc. Each extra step can incur additional costs because the changes were not part of the original project scope.
You may see how even a few source file changes on a 10-language translation project can get out of budget very quickly! Making sure your original file is final is essential for keeping your project in scope and, thus, your costs and timeline down.
–
Tip 2: Use a translation-friendly format
There are countless ways to format a document in InDesign, not all of them would be considered optimal or “translation friendly” though. In the simplest terms, cleaner formatting means less work to prepare your files, easier editing for the translators, and less time needed by the multilingual formatting team to finalize the project.
What do we mean by ”translation friendly?” Hard returns, tabs, and extra spaces that break up a sentence are not the ideal way to format text. Instead, utilize the InDesign tools to wrap and/or indent the text.
Here are a couple of examples of formatting that will cause extra preparation time and prove to be cumbersome for the translators:
Hard returns in InDesign

This is how this text with hard returns would appear in the translation tool if left unfixed:
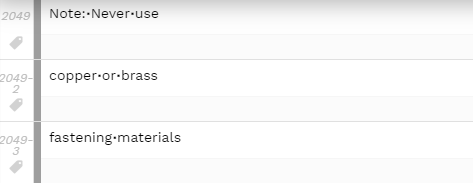
You can see how hard returns within a sentence result in the segment being split up into different ones. It will be very difficult for the translator to write and split up the text, and moreover, it will lead to faulty and incomplete Translation Memory. Hard returns should only be used when you want to break into a new paragraph/segment.
Here is the better way to format, using paragraph alignment and styling in InDesign, not hard returns:

Below, you can see how much cleaner it appears for the translation team. Everything is as it should be in one segment:

Tabs in InDesign

As you can see, tabs are being used here to forcibly wrap and indent the text. But here is how it would appear to the translators in the translation management system:

Here’s that same content, utilizing InDesign’s hanging indent feature, so no manual tabs are needed:

And here is how clean the copy will now look in the TMS:
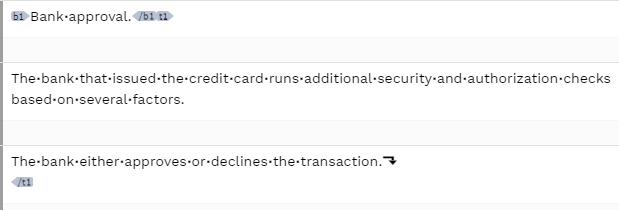
As you can see, the second method, without manual formatting marks, created a much cleaner segment for translation. A cleaner segment also means a more accurate Translation Memory. If your TM is well-curated on future projects, you can reuse much more already translated content, minimizing costs and turnaround.
If possible, your translation provider will attempt to clean up the InDesign file before proceeding with the translation. This extra step will take more time and budget to accomplish. Depending on how large the document is or how many of these occurrences need to be fixed, this could add significant charges that can be avoided if the document has clean formatting.
–
Tip 3: Don’t embed text in graphics
There are a few ways to display images that have text in InDesign. There can be a text layer on top of the graphic, or the text can be embedded in the graphic. Only one of these ways carries no extra costs besides the usual translation one, while the other will add extra charges. Can you guess which one will cost more? Embedded graphics! Let’s break down a few examples of how graphics can appear in InDesign and how their translation is handled.
Text layer
This is by far the cheapest, most efficient method when it comes to translation. The image text is part of an editable layer in InDesign. There is usually no extra prep work involved (unless, of course, any of the formatting obstacles listed above appear), which means when your project manager processes the file into the translation management system, the image text will flow in just like any other text in the document.
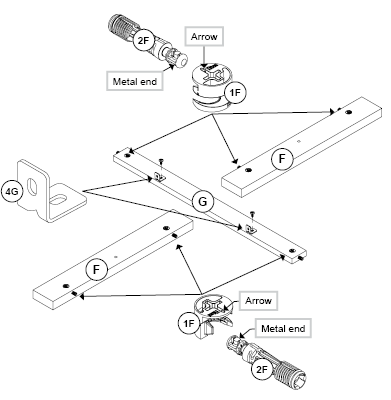
Embedded text
This type of text is not editable within InDesign. The text is part of the image, and the only way to edit it is to either open and edit the image in the tool it was created (ex., Illustrator) or create text boxes in INDD over the embedded text, retyping the text so that it can be picked up for translation.
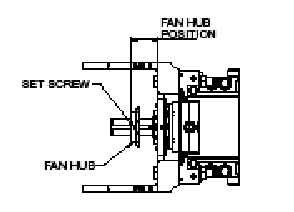
It’s understandable that often graphics are created, stored, and edited in a different program, like Illustrator. Your translation provider should have no problem working in Illustrator to translate your graphic text. If your embedded graphics were created in Illustrator, your translation provider will need those files. They would manually export the text from the editable layer in Illustrator, replace the translated version, and then relink the graphic in the INDD file. As you can see, this is a long process that results in extra work and time, adding to the scope and budget of your project.
If the embedded graphic doesn’t have an ”editable version,” meaning there is no way to access the text via Illustrator or similar software, your translation provider will have to follow the second method to create text boxes with an editable layer. This would need to be done before translation, directly in the INDD file or recreating it in a program like Illustrator.
In the above example of an embedded image, our client was able to provide the editable Illustrator files for all their graphics used. We added the additional step of extracting the text for translation and replacing it once complete. This client prefers to keep all their images in Illustrator and have us edit them there; they understand the extra step and cost involved because it fits their needs best.
–
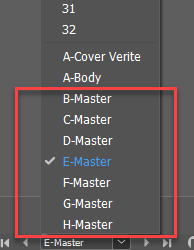
Tip 4: Identify which master pages need to be translated
We’ve seen some documents have as many as 30 master pages. That is perfectly acceptable and often absolutely necessary! We like to ask our customers to confirm if all master pages need to be translated. Sometimes, master pages are utilized for different product lines, but not all of these product brochures are translated. In that case, letting your translation provider know is a great way to save a bit of budget. Your project manager can exclude master pages you don’t need so that you aren’t wasting money (and time) translating material you’ll never use. Many translation management systems can be configured to ignore master pages altogether, or the project manager can manually remove them from the INDD file before translation.
–
Tip 5: Use layers for language-specific content
Another common content structure element in InDesign is layers that can be visible or hidden, locked or unlocked. This allows the writers a lot of flexibility to incorporate different versions of the same document into one InDesign file. One of our clients uses this method for a product brochure being used in different countries. The product and the messaging vary slightly, depending on the target market, so they have incorporated the different content into layers labeled for each country.
If you are using multiple layers in your project, your translation provider will need to know which should be translated and into which languages. Our translation management system can be configured to include or ignore hidden or locked layers. By default, any layers visible and unlocked will be translated, so if that isn’t the case with your file, it is very important to inform your project manager.

–
Tip 6: Empty your pasteboard before translation
The actual document text is included in your storyboard. We also commonly see extra text and images in the pasteboard. That area is used for storing perhaps different graphics or copy that was in a previous version and generally isn’t wanted in the actual printed or final copy.

By default, anything that is visible in your InDesign document will come through for translation in the TMS. If this copy isn’t something you want your provider to translate, it is important to clean up and empty your pasteboard before sending it for translation. If not, your provider can either remove it for you or translate the extra copy. Either of those is perfectly acceptable, but it goes without saying that it will incur extra time and costs.
–
Final thoughts
In summary, File Status, Formatting, Images, Master Pages, Layers, and the Pasteboard will all affect the project scope, budget, and timeline. Having a final, clean INDD file and working with your translation project manager to communicate your needs regarding images and content is the best way to ensure your project is handled as efficiently as possible, with the highest quality outcome.




Comments