
One of our customers recently requested that we translate a SurveyMonkey survey while leveraging the translation memory we have built for them over the years. This type of request can be challenging. There are many content management systems (CMS), customer relationship management systems (CRM), and e-mail automation programs that don’t support translation workflows. What does that mean?
An ideal workflow for translation management systems is to parse or import a file for translation directly into the system. Many applications can’t export a file for translation. The subsequent workflow turns into a process of cutting and pasting content from the source application into an MS Word file or Excel table and then cutting and pasting the material back into the form. This process runs afoul of almost all best practices in the translation industry, creates a ridiculous amount of work, and opens the entire process up to errors.
Many CRM, CMS, and e-mail automation programs have a way to export translation content into an intermediary file type like a PO (portable object file) or an XLIFF (XML-based multilingual translation exchange file). This ability allows for direct import into a translation management system, resulting in a far more efficient workflow. Working directly in the content also permits the translation firm to leverage translation memory, facilitate faster and less expensive updates, and save the customer a ton of cutting and pasting!
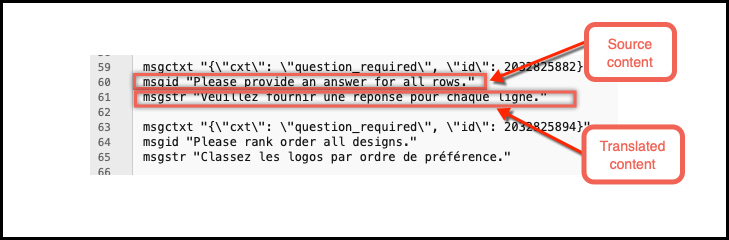
Here is an example of the source content and translated content in a PO file.
You can find the full instructions and tips in Survey Monkey’s help article, but here are the highlights.
How it works
You can let survey takers choose their preferred language from a dropdown menu, or you can send a unique link for each language that opens the survey in that language automatically.
It’s easy to set up. Here are the steps to follow (courtesy of SurveyMonkey).
- Finalize your survey design and collector options
One important point at this stage is to make sure you finalize your survey before you add a language and launch your translation project. If you make changes after you start the translation project, you may have some rework involved with those changes. For example, if you are handling this project in ten languages, you now have to make the changes ten times!
- Add a language
Once you add a language to your survey, you can download the translation file for that language and start working on translations. The process is simple in SurveyMonkey.
- To add a survey language
- In the Design Survey section, click Options in the left sidebar.
- Click Language.
- Choose the default survey language from the dropdown‚ this is the language you’ll base the other translations on.
- Click + Language to open the Survey Languages window.
- Click + Language.
- Choose a language from the dropdown‚ you can also search, which might be helpful since this is a long list.
- Click Add.
- Click Download ¯ to download the translation file to your computer.
- Click Done. At this point, you can translate the data on your own by using a PO editor, or you can send the file to your translation service provider.
- Read the next sections to learn how to translate the data and upload the file back to SurveyMonkey.
- Dialects & locales
Some languages have different dialects based on country or region. For these languages, you can click the + Locale option and choose the specific dialect or locale for which you would like to provide translations.
- Right-to-left (RTL) languages
If including RTL languages, like Hebrew or Arabic, make sure to make it your default survey language. This step ensures that your RTL text and other languages display correctly.
- Add the translations to the file
SurveyMonkey generates PO files. This file format is commonly used in software translation workflows. Your translation service provider should have no issues working with this type of file.
- Upload the translated file to SurveyMonkey
Once you save your translated PO file, go back to SurveyMonkey and upload the translations to your survey.
- To upload your translated PO file to SurveyMonkey
- In the Design Survey section, click Options in the left sidebar.
- Click Language
- Click Edit Languages to open the Survey Languages window.
- Next to the language you want to upload, click Upload translation.
- Upload your translated PO file.
- The language is automatically enabled and ready to go, but you can click the toggle to disable the language if you want to wait before making it live.
- Check to make sure that the file is 100% translated. If it says anything less than 100%, you’re missing translations for some of your survey text.
- To add missing translations
- Click ¯ to download the current translation file.
- Translate the remaining text in the file.
- Save the file.
- Go back to the Design Survey section in SurveyMonkey and click Options > Language > Edit Languages.
- Click Replace file.
- Upload the updated file.
Now that you have completed the multilingual survey, your next task will be to analyze your results. Since those results may include content from free-form text fields, you will need to come up with a strategy on how to interpret the content your users have provided. Keep in mind that if you have large volumes of content and a limited budget, you can use machine translation to get a gist of the material. If the content needs to be very precise, you should use human translation.


